As we have learned to cut DNA at specific sites, its now time to learn to join DNA fragments and that is exactly this week is about.
Theory Task
Design a gene. Describe a detailed workflow for constructing and expressing it. Identify how the parts of your genetic construct relate to DNA replication and the Central Dogma of Molecular Biology.
To design a gene we need to understand its parts. A complete functional gene has 4 main parts.
- Promoter: Tells the cell when to produce the protein and how much to produce. This is where rna polymerace will bind and start transcribing the mRNA.
- Ribosome Binding Site: This is the place where ribosome will bind after the gene getting transcribed to mRNA. A strong RBS will enable more ribosomes to bind to the region and therefore more protein synthesis.
- Coding Sequence: The actual code for the protein. This starts with a start codon (ATG) and end with a stop codon(TGA, TAG, TAA). These codons comes handy even when we are starching to a coding sequence in a wild dna sequence.
- Terminator: This is the specific sequence which tells the RNA plymerase to stop transcribing and fall off.
In these parts the coding sequence is the actual code for the protein and the other
parts helps in controlling the
time and quantity of production of the protein. So choosing the right one is very
necessary in properly expressing the gene.
It is to be noted that that a particular protein need not be always generated all
the time. It need to be regulated by some
molecule in the cell. Thus promoters are very important in controlling when to
express a particular gene. Also the RBS will
decide how much of the protein will be generated. A strong RBS will help bind more
ribosomes and therefore more protein production.
Thus the choice of all these parts are critical in properly engineering a gene and
trying to express it.
Igem is a good place to find these biological parts, they have
1000s of parts which includes promoters, RBS coding
sequence etc. We can choose from these parts depending on our need and assemble them
together with a proper assembly strategy
to produce the gene of interest.
It is also good to keep in mind the central dogma of biology before getting in depth
with gene engineering.
Central Dogma of Molecular Biology

The central dogma describes the process of production of protein from a gene.
Initially mRNA is generated from DNA this process
is called transcription. This mRNA then codes for the protein. Ribosomes recruit
necessary amino acids and translate the RNA
into protein molecules.
In prokaryotes the process is more complex due to the presence of non-coding regions
in a coding sequence.
Though the the dna is double stranded, only one of the strand codes for the RNA.
This is usually the 5' end to 3' end were
the transcription takes place.
Mission
I want to design a gene which will code for bioluminascence in e.coli. I am planning to use Gibson assembly.
Gibson Assembly
Gibson Assembly is a dna assembly method developed by Danial Gibson in 2004 and it is one of the most popular dna assembly method now. The most important advantage of this method is that multiple fragments of dna can be assembled in a single reaction and it does not leave restriction scars in the assembled dna. Ulike traditional assembly techniques, this method requires fewer number of components and can be done in a single tube.There are 3 main enzymes required for this process namely.
- 1. T5 exonuclease This enzymes chews the dna from the 5'end leaving overhangs
- 2. Phusion polymerase This enzyme synthesys complementary dna strand
- 3. Taq DNA ligase It joins the dna forming a continous sequence.
These enzymes are added to the dna fragments with induced overhangs and incubated at
the required temperature.
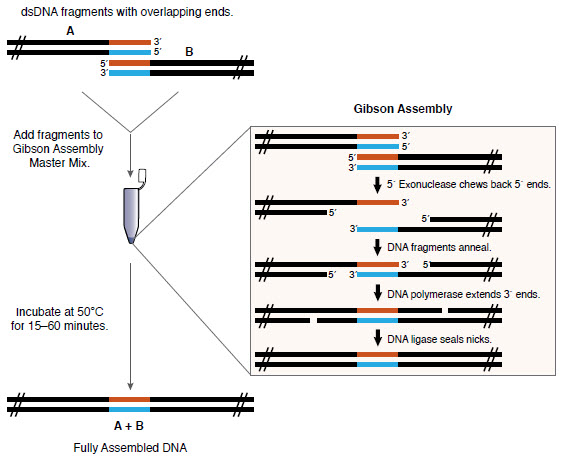
We initially have the dna fragments
to be joined. First we add an overhang to the fragments of around
20 nucleotides with PCR. The overhangs are done in such a way that they are the same
for the
ends in the fragments to be joined. This can be seen in the image. Here we have
fragments A and B
with overhangs in red and blue.
Now when these fragments are added with the enzymes and incubated,
at first the exonuclease enzyme chews the fragments in the 5' end
leaving complementary sequence in the two fragments which leads
to the annealing of the two complementary strands in the two fragments.
Once it gets annealed, the dna polymerase enzyme comes and repairs the
excess digested parts and later are joined into a continuous strand by
ligase enzyme. Thus after the full process which takes around 30 mins to
an hour we get a fully assembled single fragment from the two.
We can note that no scars are left behind in the new assembled fragment.
This
is a good tutorial on gibson assembly.
The following video explains how we can design primers for gibson assembly. This is
the manual way of
doing it, but we usually do this with software but its a good thing to know what is
happening.
Gibson assembly in benchling
Here i am planning to use gibson assembly in benchling to assemble my gene. The following is a good tutorial on this.As far as i understand, the method explained here used a restriction digestion, but that is not always necessory when we are doing gibson assembly.
My assembly in benchling
After all those background information and learning lets gets into trying an assembly
myself.
As stated above i am trying to assemble a complete gene which can express
bioluminance in
ecoli. The complete
luminance
expression in the organism is complex and controlled by an operon known as the lux
operon.
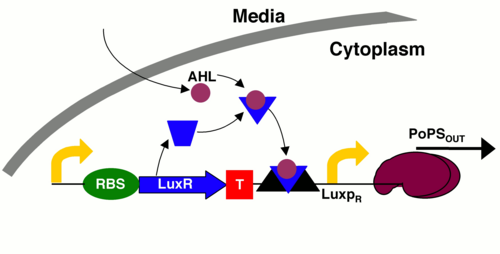
The lux operon encodes genes for self-regulation and for the production of
luminescent proteins.
There are 3 component genes in this operon, namely 1.pLuxR, 2. LuxR and 3. LuxI.
LuxR is a constitutively expressed protein that can bind AHL( acyl-homoserine
lactones ).
When this protein is bound with AHL, it can initiate transcription from pLuxR
promotor which activates LuxCDABE protein coding region producing the necessory
proteins.
Here the AHL molecule is controlling the expression of bioluminance. AHL is in-fact
produced
by each cell in a limited amount. When there are a sizable number of cells this
molecule reaches a
threshold concentration which activates the luminance expression proteins. This
phenomena is called
quorum sensing and serves as the control mechanism for luminance in the wild.
In this work i am only trying to introduce the LuxCDABE coding region into the
ecoli. I am doing this in benchling
software.
Firstly i needed the puc19 plasmid and the LuxCDABE gene sequence. PUC19 was
directly obtained from snapgene.
The sequence for LuxCDABE was not directly obtained instead it was obtained in a
plasmid PGEN-LuxCDABE from addgene
website.
Steps
-
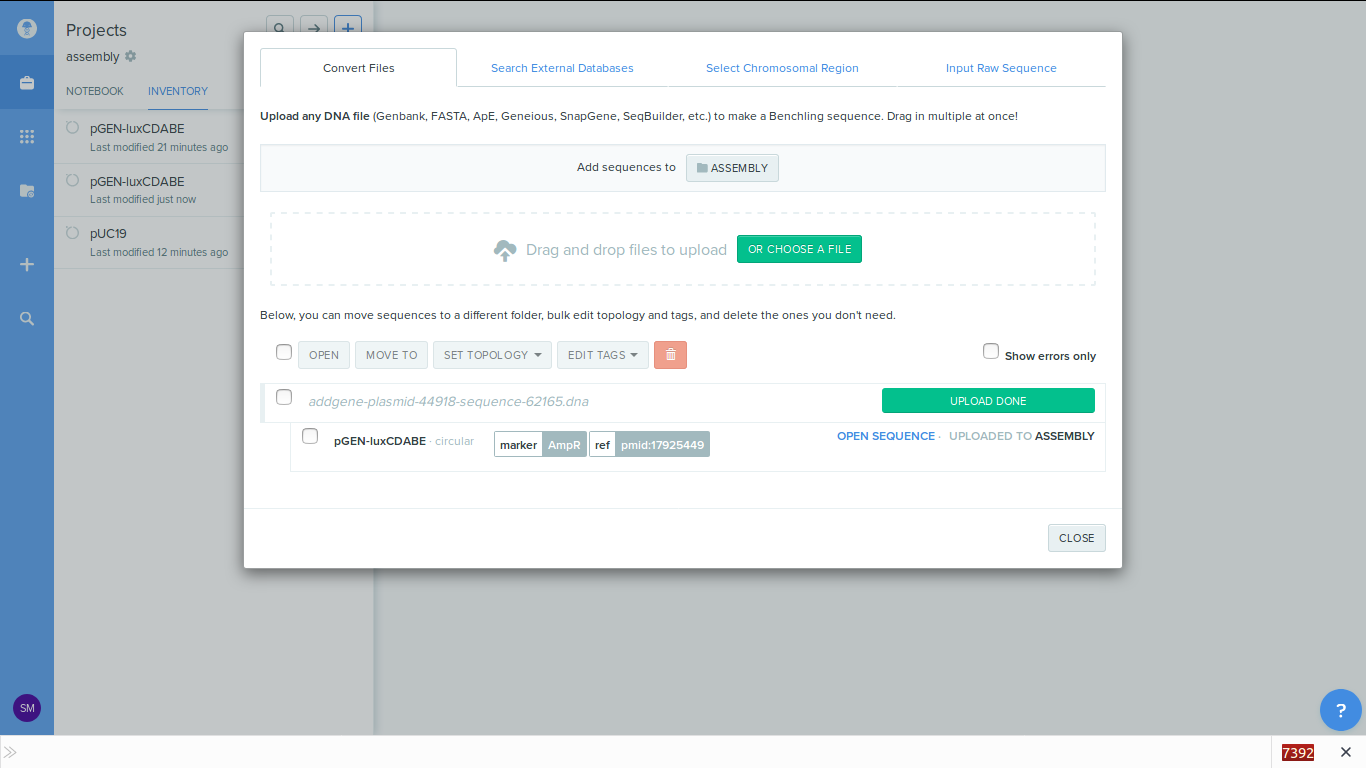
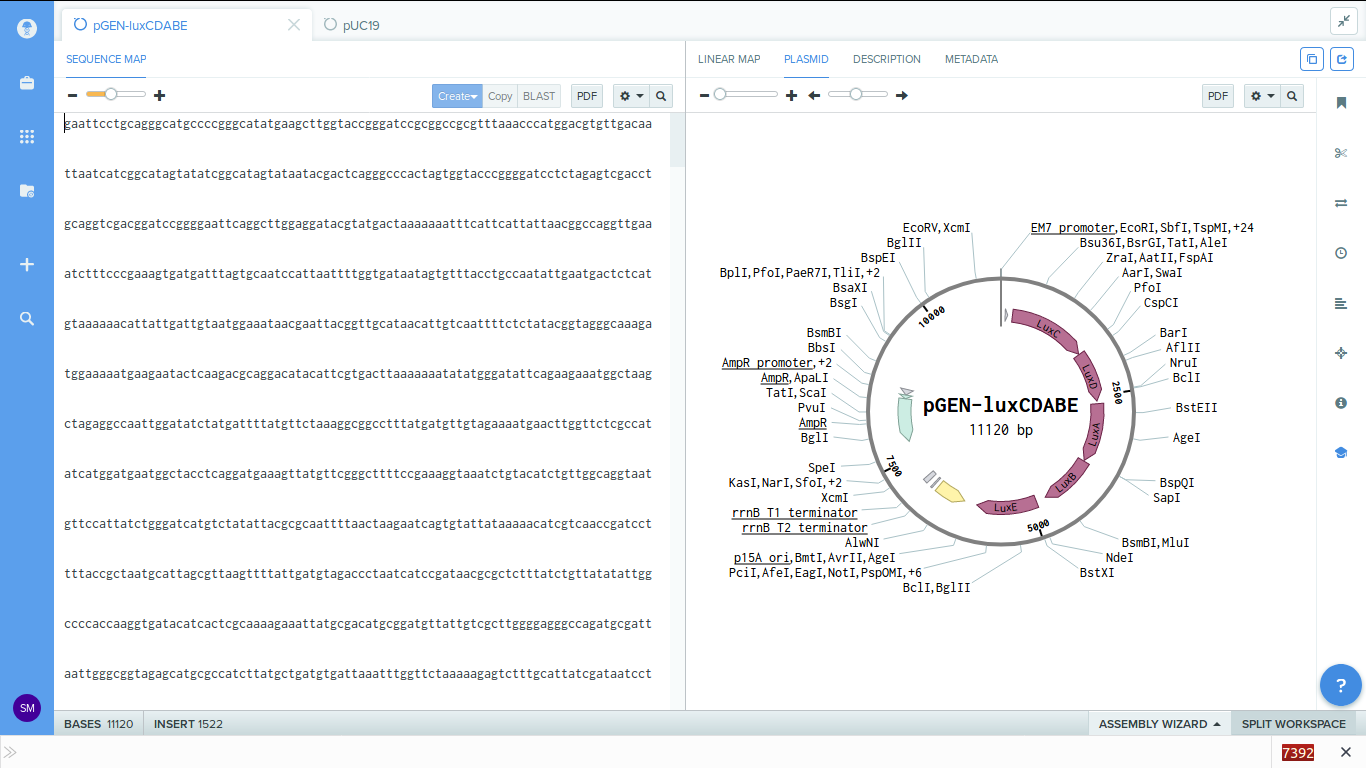
1. Load the sequence files into the benchling. Here i am using the import file
option.
-
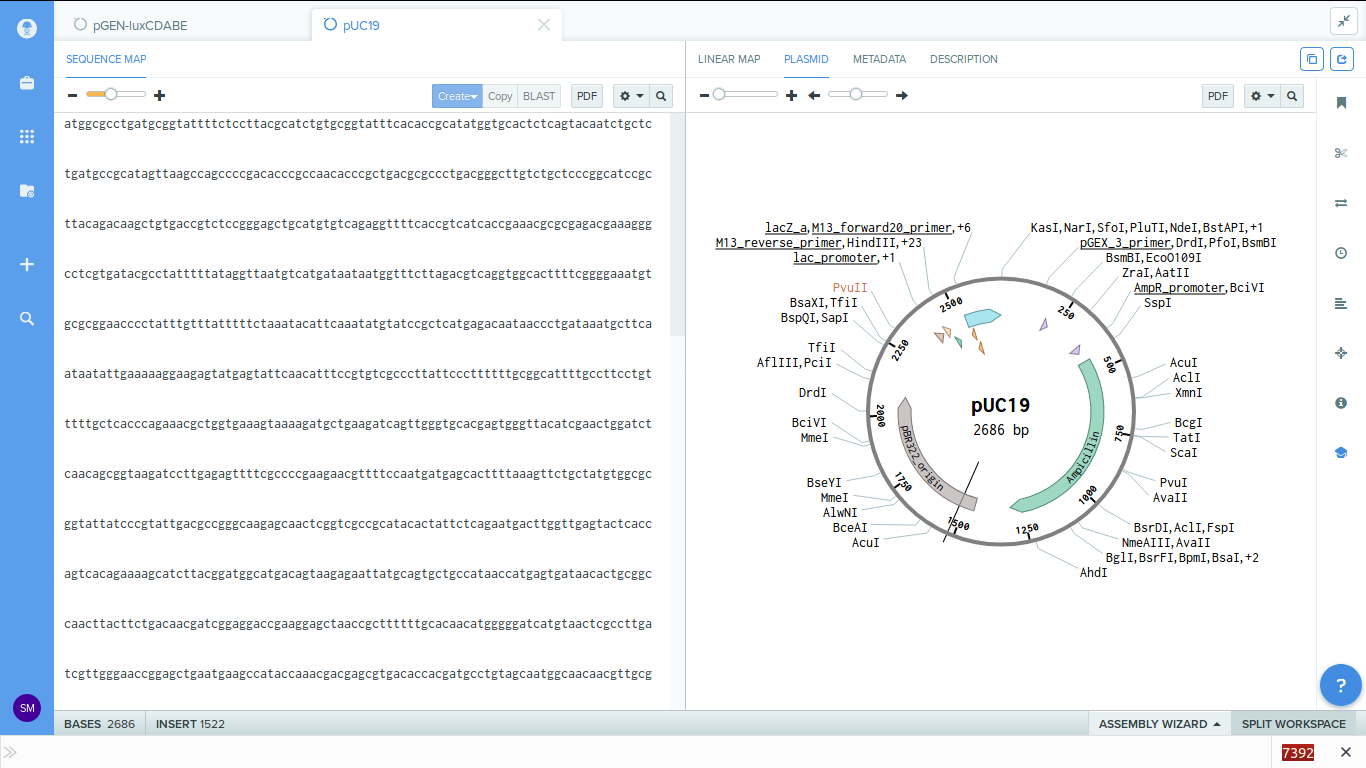
2. Now the plasmids got imported into the software, we can view the parts.
-
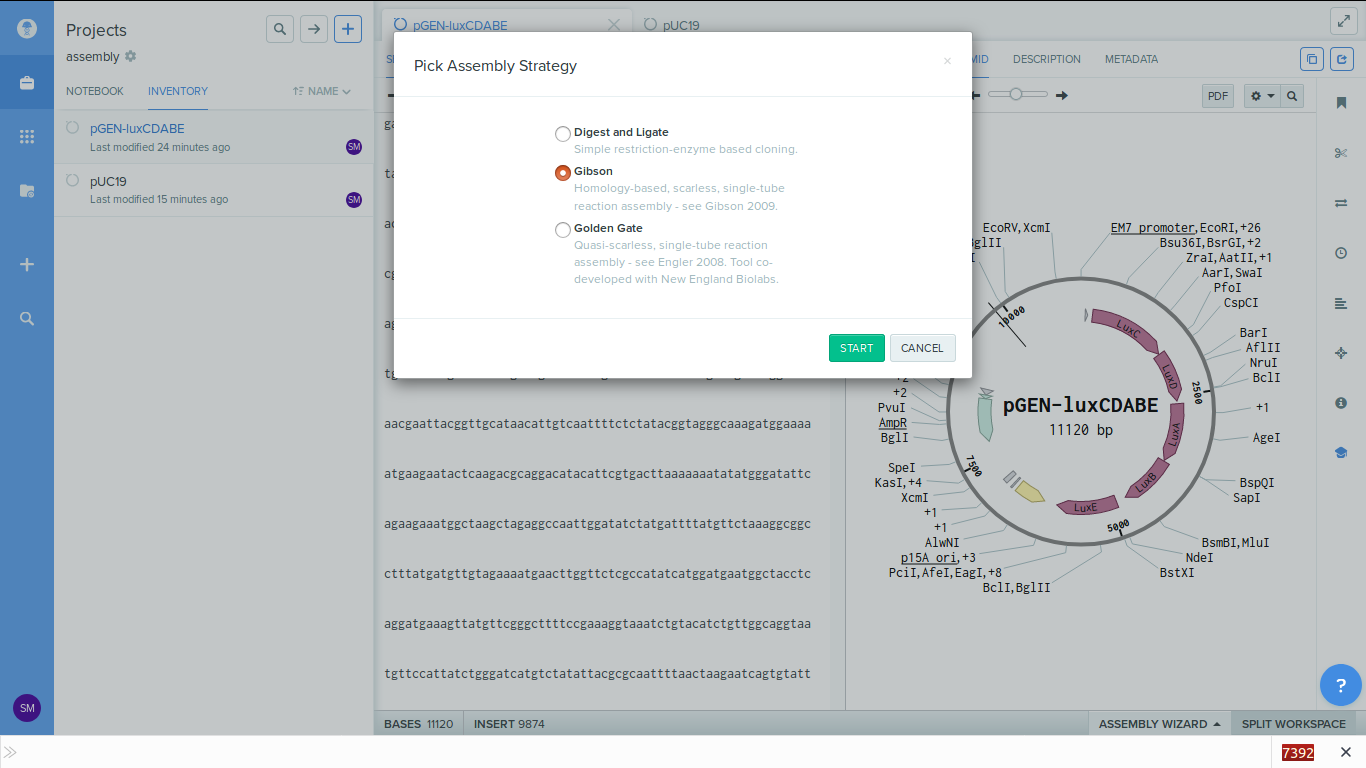
3. Now click on the 'Assembly wizard' button on the bottom right and choose 'new
assembly'. From the pop up window which comes up
select gibson assembly and click start.
-
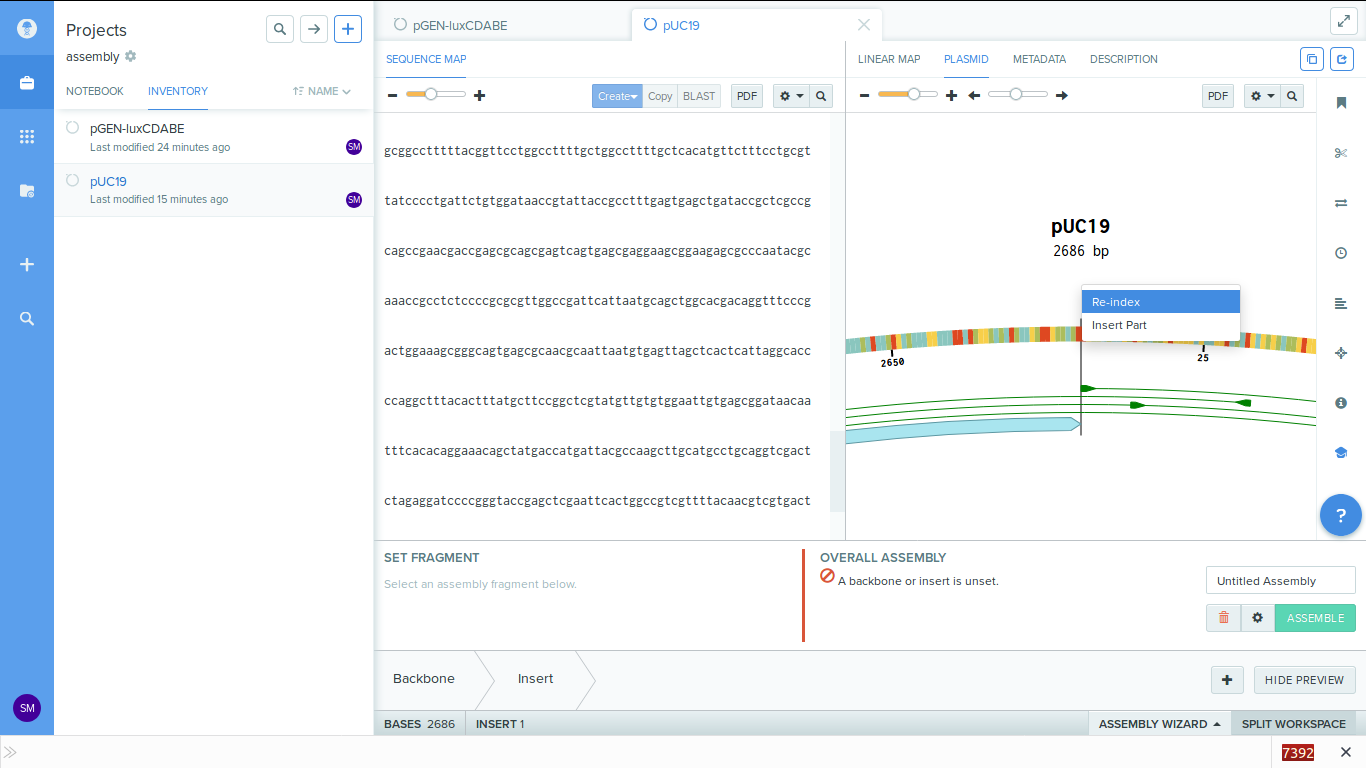
4. Reindex the backbone plasmid. Here we are using PCA cloning approach to
generate the linear dna fragments. By
default benchling ligates at location "1". So we have to reindex the map such
that location 1 is moved to the
area where we want to insert the sequence.
-
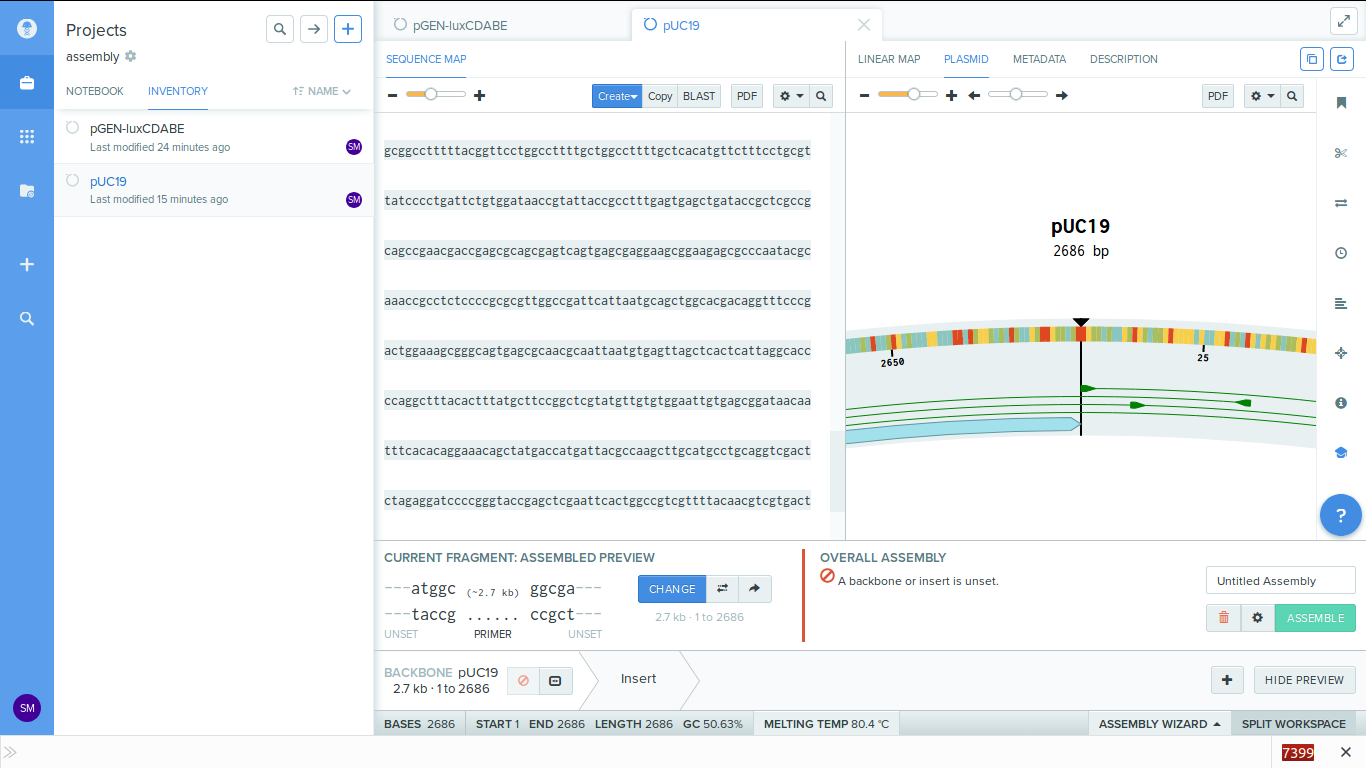
5. Set the backbone. On the bottom left there is a place where we can choose the
backbone. Click on it and choose the entire puc19
plasmid sequence as the backbone.
-
6. Set the insert. Near the backbone button there is the insert button. Click on
this and select the region of the LuxCDABE gene.
Make sure that the entire sequence of the genes are selected.
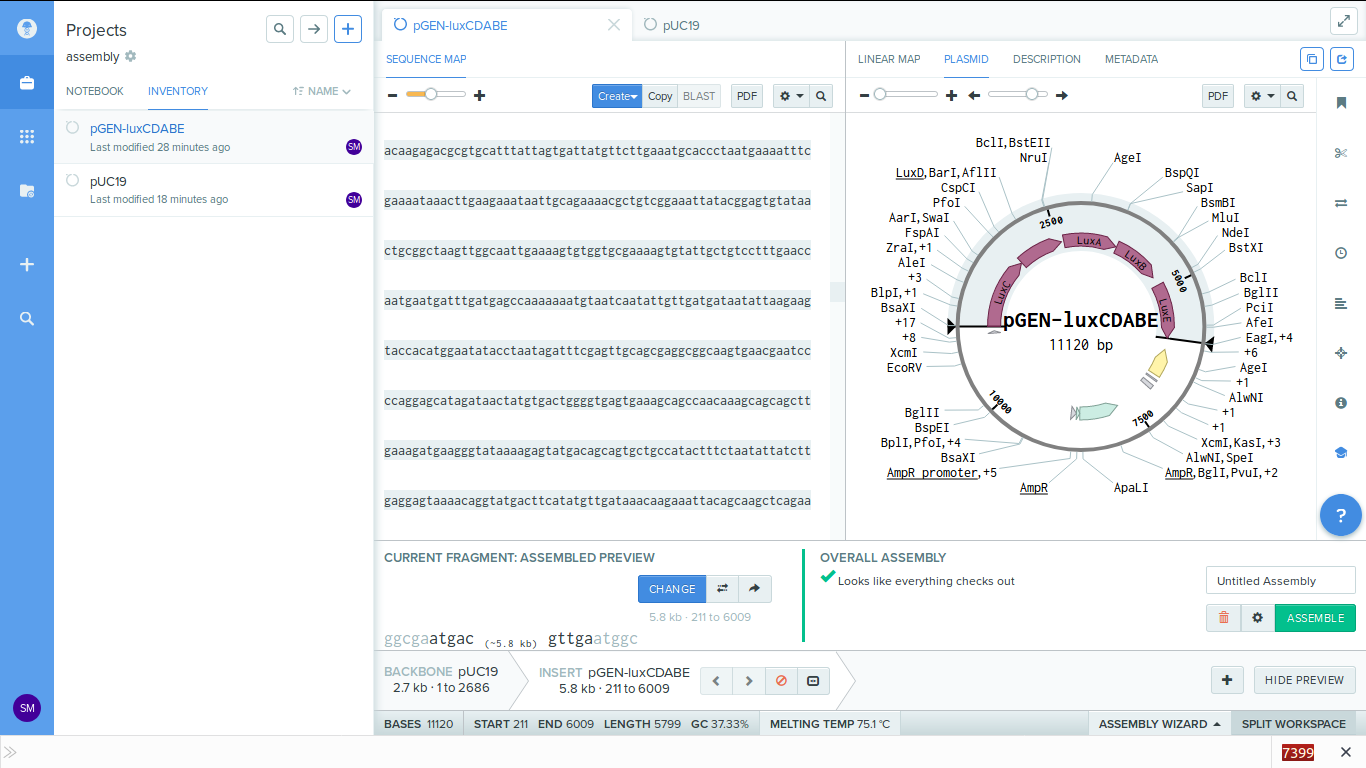
-
7. You can change the primer settings by clicking on the gear icon on the bottom left.
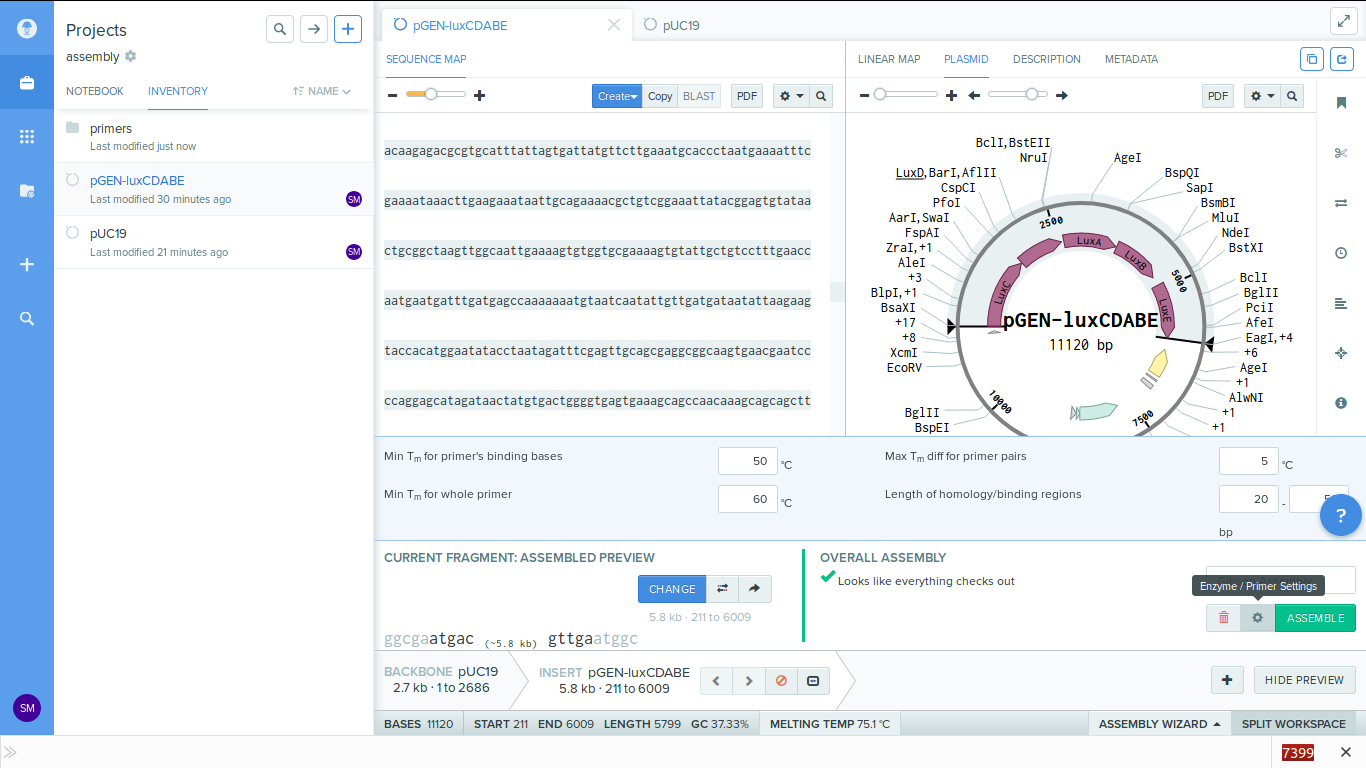
-
8. Click assemble to process. Before doing this i created a new folder called 'primers' to store my generated primers.
Once you click on the assemble button a pop up will appear asking for the location where we want to store the primers.
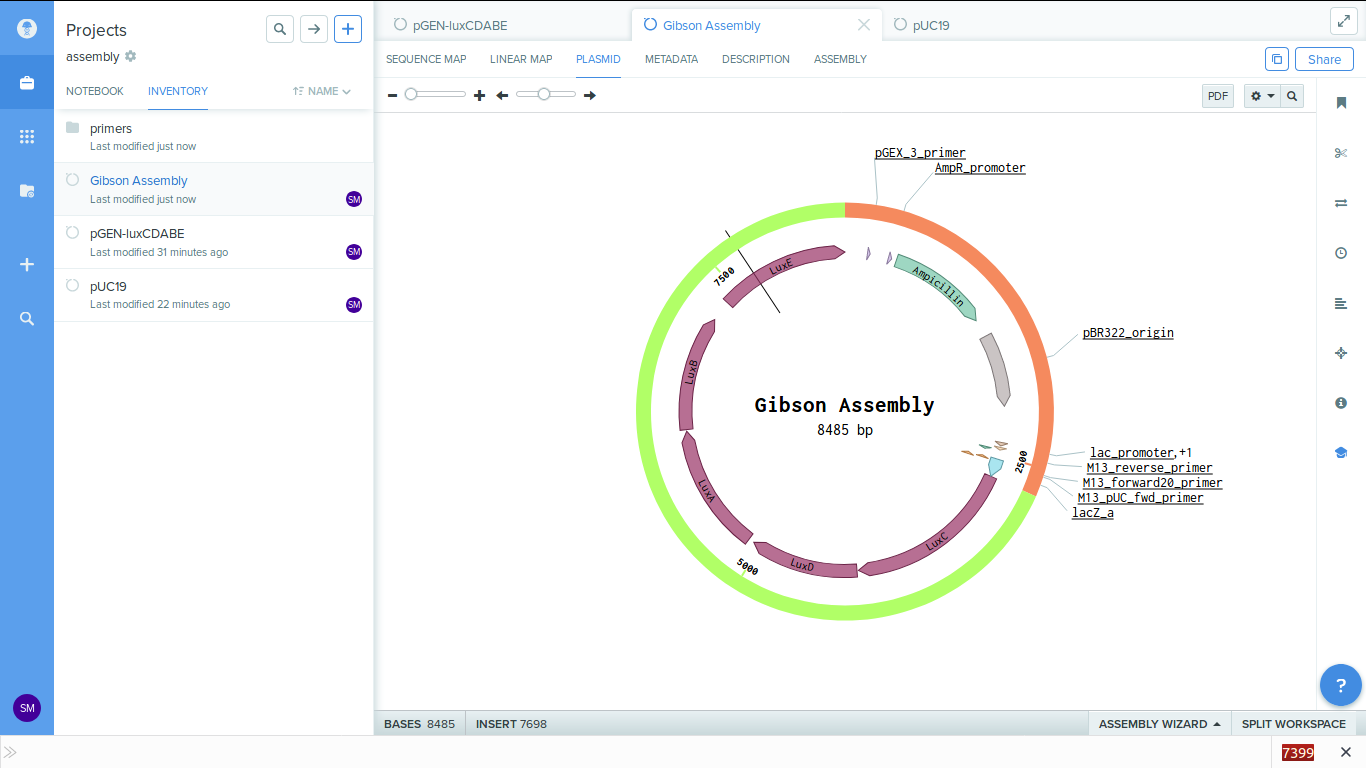
On completing the process you get the assembled plasmid as below.
-
You can see that the lux genes got attached next to the lac promotor.
-
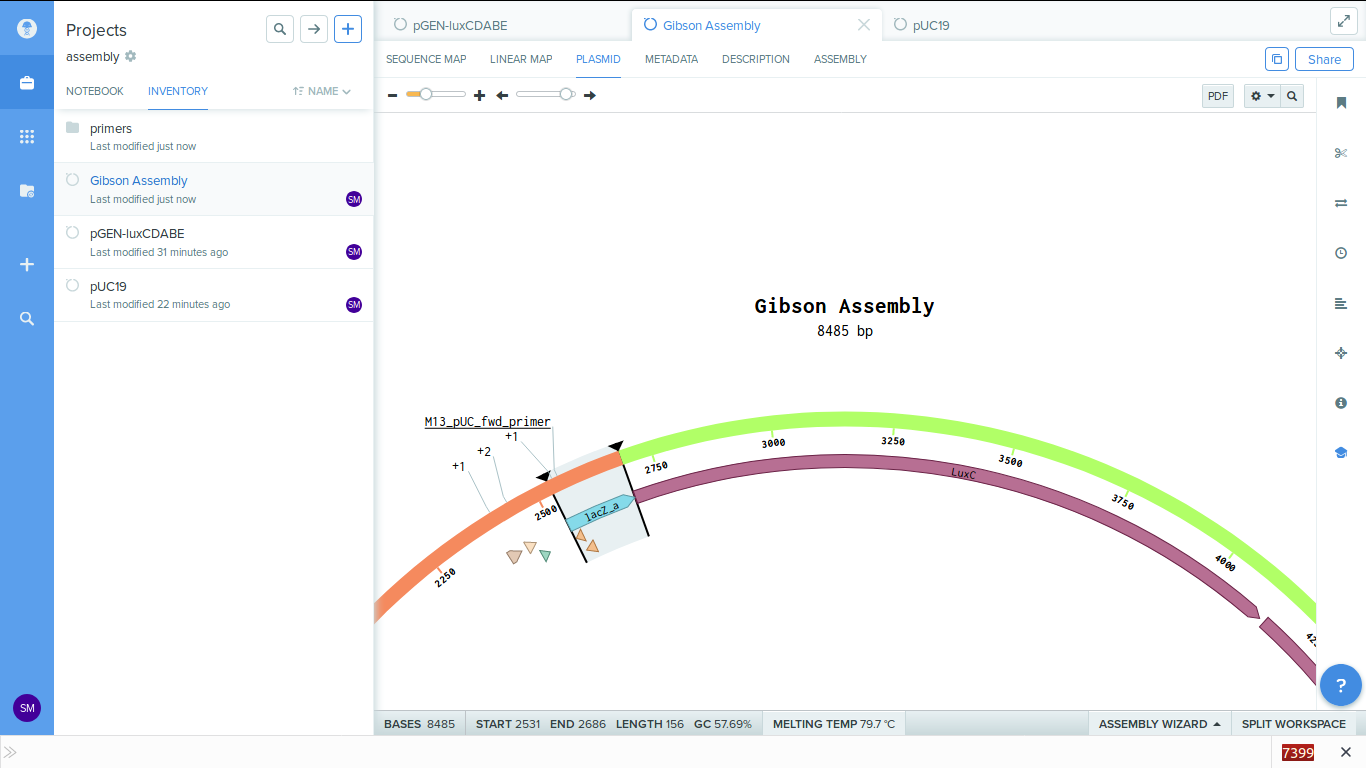
We can also see the primers in the plasmid map. These primers are generated for us by the software.
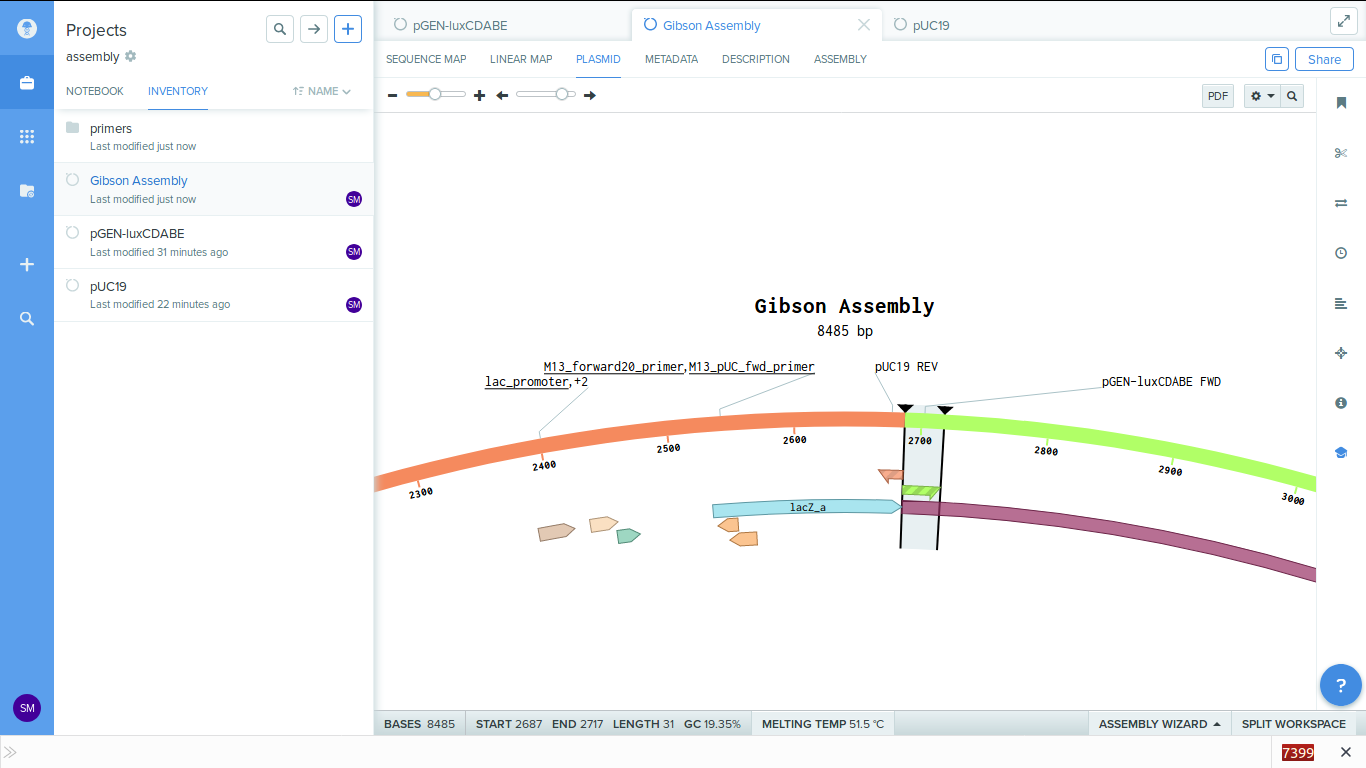
-
9. Inside the primers folder you can see the details of the primers which got generated.
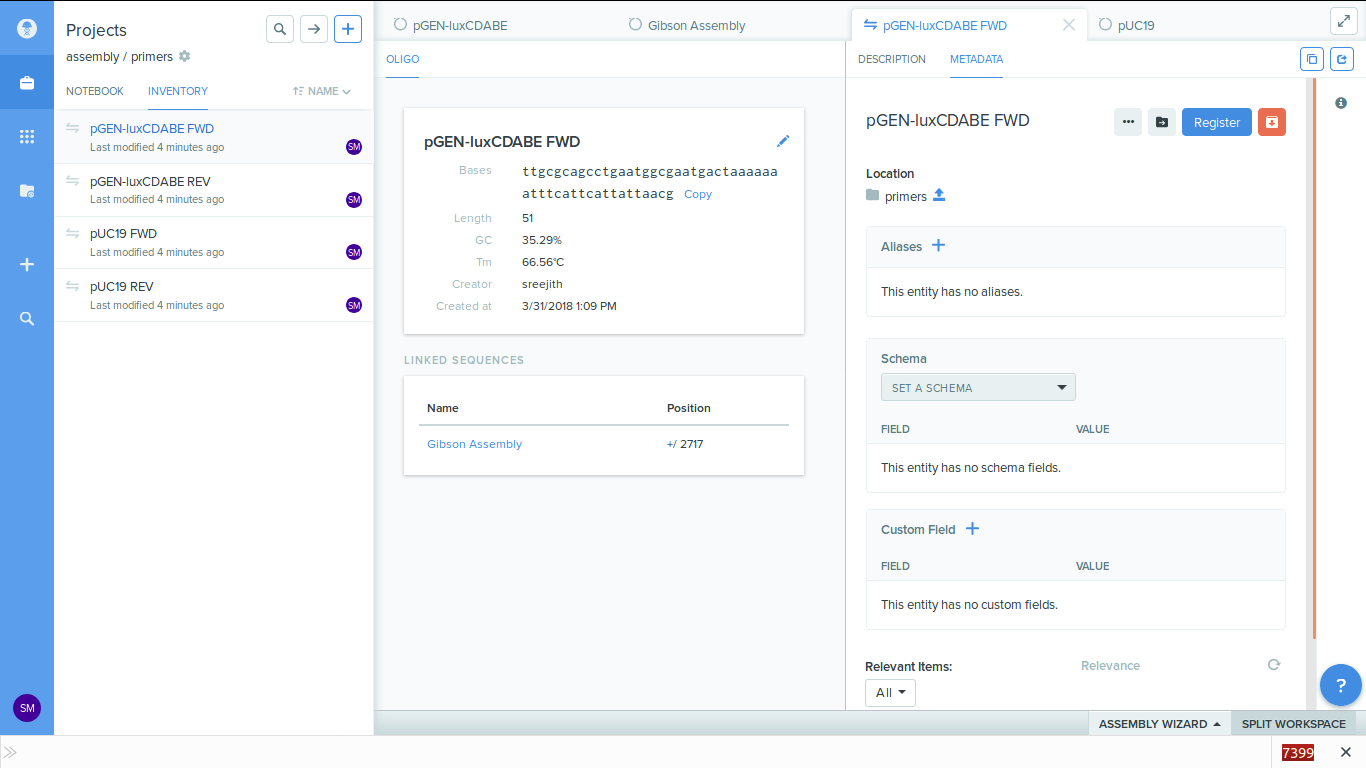
Ethics/ safety considerations this week
Do your activities this week raise new ethics and/or safety considerations you had not considered in week 1? Describe what activities have raised these considerations and any changes you have implemented in response.
Recombining DNA can be catastrophic if done in an uncontrolled manner. Unwanted and dangerous mutations might occur during this process which when introduced into a living cell might cause catastrophic results. But thanks to the researches who have spend so much of time in mastering the process and developing protocols to do the same. Even that being said there is still a minor chance of error which we need to be careful about.